SOURCE-BACKED VPN COMPARISONSClear prices. Informed choices.
stealthvpn. Shortlist 0
← All VPN software

FREE & OPEN-SOURCE SOFTWARE

WireGuard

WireGuard uses public-key peers and a deliberately small protocol design. Official implementations and clients cover Linux, Windows, macOS, BSD, Android and iOS.

THE IDEA, MAPPEDA peer-to-peer tunnel.
  1. 01

    Public-key peer

    Credentials identify the authorized endpoint.

  2. 02

    Encrypted connection

    Protocol and configuration define the tunnel.

  3. 03

    Allowed routes

    Routes and access policy decide what is reachable.

Conceptual topology, not a deployment we tested. Follow the project documentation for supported configurations and operational requirements.

VPN protocol & implementations

A compact tunnel for personal remote access and networks you administer.

Software cost and scope

No software license fee for the listed open-source edition. Hosting, bandwidth, hardware and administration are separate.

License: Component-specific free software licenses, including GPL-2.0 and MIT. Official project and implementation choices; licenses differ by component.

Read the project license information (opens in a new tab)

What you configure

You configure a reachable peer/server, keys, routes, DNS and firewall behavior.

Protocol: WireGuard.

SEE THE CONTROLS. FOLLOW THE STEPS.

Connect with WireGuard on Windows

Windows client · 7 steps

Connect an existing, authorized gateway. Server deployment is separate.

What you’ll do: Import your device’s configuration, connect to its peer, check the intended route, and disconnect.

Documentation checked 2026-11-09. Source-based walkthrough; we have not deployed or tested this connection. Pictures are labelled by origin. Publisher screenshots can show older interfaces; use the linked current documentation when your version differs.

Version scope: Official WireGuard Windows workflow. Proton’s English screenshots and IPFire’s German Windows 11 screenshot are published reference examples; exact client builds are not stated. The IPFire image is from September 2024. Your own gateway and routes may differ.

Before you start

  • Install the official Windows client.
  • Obtain a trusted .conf profile and confirm the gateway, routes and DNS with its operator.
Configuration
A .conf file issued for this device by your gateway operator.
Destination
The private resource or permitted internet route you want to use.
Expected settings
Endpoint, AllowedIPs and DNS supplied by the operator.

Use your own authorized account and configuration. Keep private keys, QR codes and sign-in codes out of shared pictures.

  1. Install the official Windows client

    Start with the client for your operating system.

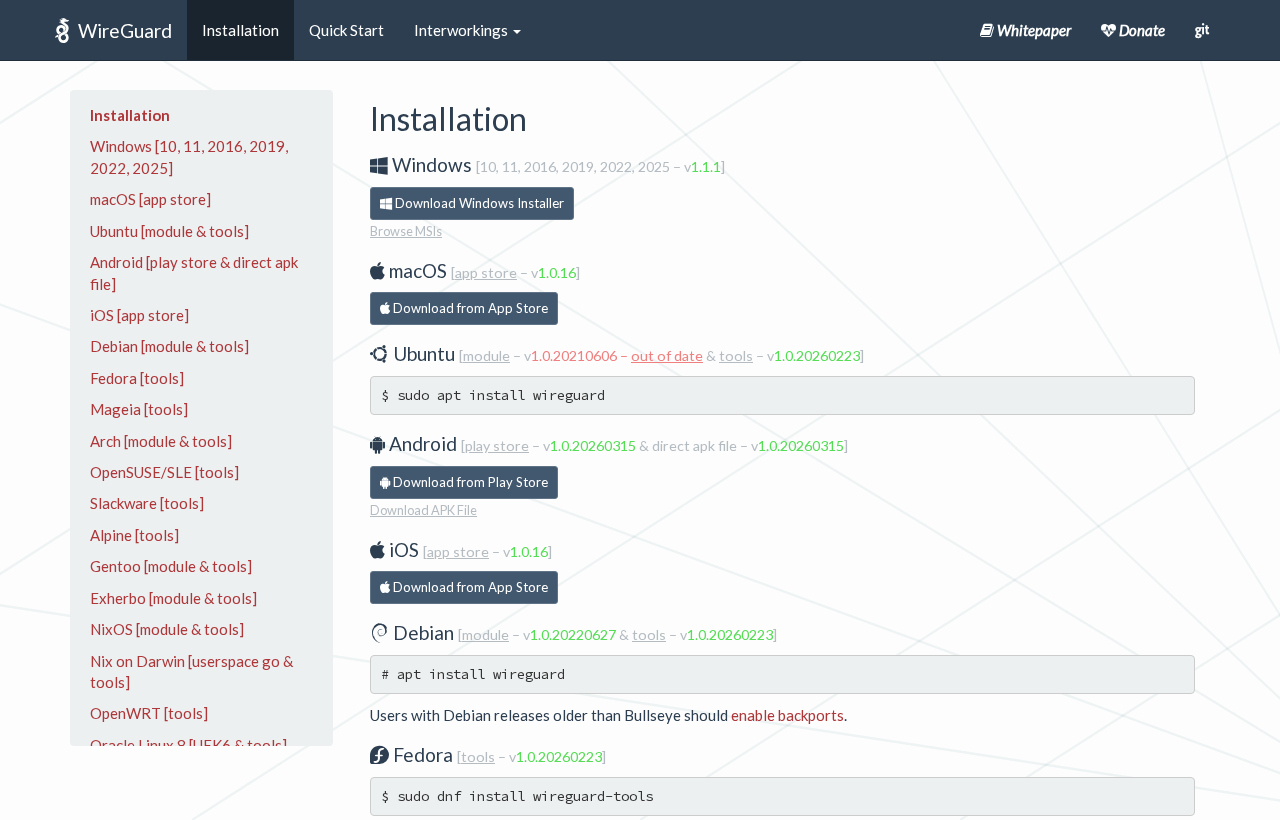
    1. Open the official installation page linked below and choose Windows.
    2. Run the installer with the required permission, then open WireGuard.
    What you should see

    The WireGuard client opens; installing it alone has not created a tunnel.

    WireGuard official installation options (opens in a new tab)

    Documentation screenshotInstallation - WireGuard — official documentation page. (opens in a new tab)
    Open full size (opens in a new tab)StealthVPN browser capture of the official documentation, 9 November 2026. Shows the website, not an installed application or completed connection.Source: WireGuard official installation options (opens in a new tab)
  2. Import your device’s configuration

    Have the profile ready before creating the connection.

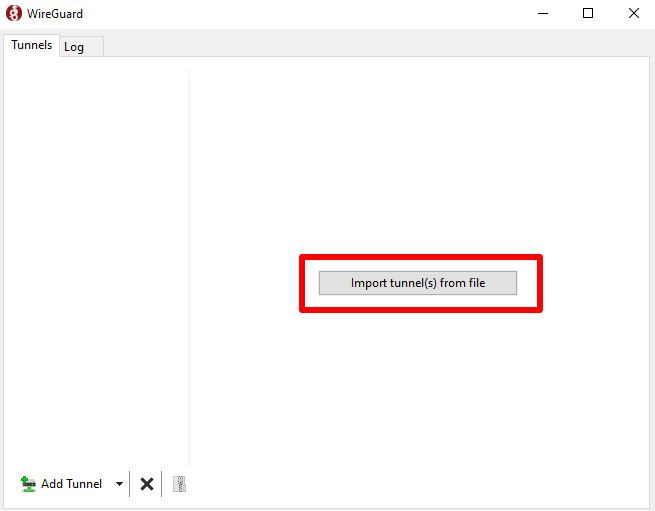
    1. Choose Import tunnel(s) from file and select your issued .conf file.
    2. Select the imported tunnel in the list; keep its keys private.
    What you should see

    The expected tunnel name appears in the left-hand list.

    WireGuard Windows client source (opens in a new tab) · IPFire project: WireGuard Windows workflow (opens in a new tab) · Proton: official WireGuard client on Windows (opens in a new tab)

    Publisher screenshotImport Tunnel(s) from File (opens in a new tab)
    Open full size (opens in a new tab)Proton support documentation; unmodified publisher screenshot. Published example, not our connection. Exact application build is not stated.Source: Proton: official WireGuard client on Windows (opens in a new tab)
  3. Match the profile to your task

    Check the gateway and routing scope before activation.

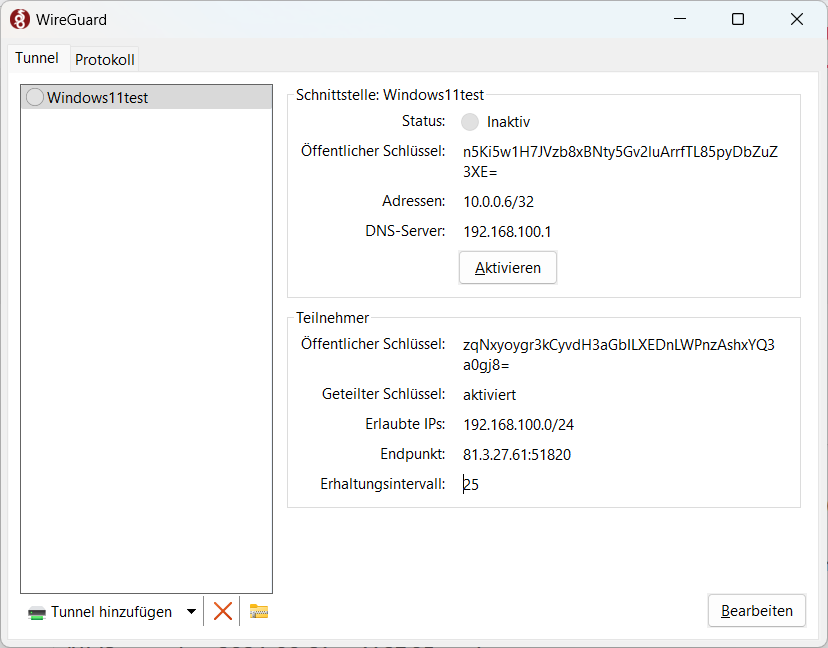
    1. Compare Endpoint, AllowedIPs and DNS with the operator’s instructions.
    2. In the German screenshot, Endpoint is Endpunkt and AllowedIPs is Erlaubte IPs.
    What you should see

    Use your own values. The pictured private subnet is an example, not an internet-wide route.

    IPFire project: WireGuard Windows workflow (opens in a new tab) · wg-quick routing and configuration reference (opens in a new tab)

    Publisher screenshotIPFire documentation screenshot of WireGuard on Windows: a saved tunnel, DNS, peer routes, endpoint and Activate control; German interface. (opens in a new tab)
    Open full size (opens in a new tab)Unmodified IPFire documentation screenshot, published September 2024. German UI on Windows 11; exact WireGuard build not stated. Addresses and public keys are publisher examples.Source: IPFire project: WireGuard Windows workflow (opens in a new tab)
  4. Understand the route you approved

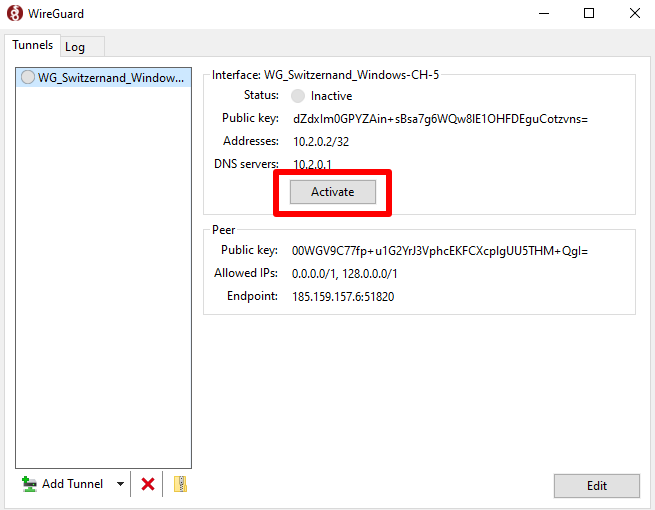
    An endpoint and a destination route answer different questions. The English publisher example shows two IPv4 default-route halves; that is not the private-subnet example above or proof that IPv6 is covered.

    1. Confirm whether this profile reaches a private subnet or routes internet traffic.
    2. Ask the operator about any unexpected route or resolver before changing it.
    What you should see

    The intended destinations are covered by the profile’s allowed routes.

    wg-quick routing and configuration reference (opens in a new tab) · WireGuard quick start and peer configuration (opens in a new tab) · Proton: official WireGuard client on Windows (opens in a new tab)

    Publisher screenshotActivate the VPN tunnel (opens in a new tab)
    Open full size (opens in a new tab)Proton support documentation; unmodified publisher screenshot. Published example, not our connection. Exact application build is not stated.Source: Proton: official WireGuard client on Windows (opens in a new tab)
  5. Activate the selected tunnel

    Choose Activate for the profile you reviewed.

    1. Select its name, then choose Activate; the English screenshot shows the control before connection.
    2. Approve only the expected permission request for the installed client.
    What you should see

    The tunnel shows an active local state; the next step checks the peer.

    WireGuard Windows client source (opens in a new tab) · IPFire project: WireGuard Windows workflow (opens in a new tab) · Proton: official WireGuard client on Windows (opens in a new tab)

    Publisher screenshotActivate the VPN tunnel (opens in a new tab)
    Open full size (opens in a new tab)Proton support documentation; unmodified publisher screenshot. Published example, not our connection. Exact application build is not stated.Source: Proton: official WireGuard client on Windows (opens in a new tab)
  6. Check the handshake and your destination

    Generate traffic before judging whether the peer responds.

    1. Open the private resource or permitted destination.
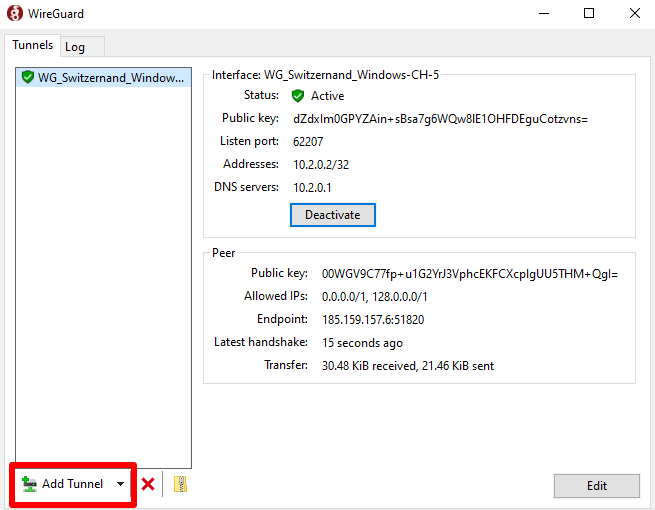
    2. Check for a recent handshake and increasing transfer counters after traffic.
    What you should see

    The resource works over the intended route; an active switch alone is insufficient.

    WireGuard quick start and peer configuration (opens in a new tab) · wg-quick routing and configuration reference (opens in a new tab) · Proton: official WireGuard client on Windows (opens in a new tab)

    Publisher screenshotOfficial WireGuard Windows client showing active state, Deactivate, last handshake and transfer counters. (opens in a new tab)
    Open full size (opens in a new tab)Proton support documentation; unmodified publisher screenshot. Published example, not our connection. Exact application build is not stated.Source: Proton: official WireGuard client on Windows (opens in a new tab)
  7. Deactivate when you are finished

    Stop this session from the same client.

    1. Select Deactivate for the tunnel you connected.
    2. Recheck the resource and any automatic connection setting you enabled.
    What you should see

    The tunnel is off and traffic behaves as you expected.

    WireGuard Windows client source (opens in a new tab) · WireGuard quick start and peer configuration (opens in a new tab) · Proton: official WireGuard client on Windows (opens in a new tab)

    Publisher screenshotOfficial WireGuard Windows client showing active state, Deactivate, last handshake and transfer counters. (opens in a new tab)
    Open full size (opens in a new tab)Proton support documentation; unmodified publisher screenshot. Published example, not our connection. Exact application build is not stated.Source: Proton: official WireGuard client on Windows (opens in a new tab)

Check the result

Try the private resource you intended to reach. If the profile routes internet traffic, check the resulting exit and DNS as well. These checks are not an anonymity guarantee.

  • The named peer has a recent handshake after traffic is sent.
  • The intended private resource or permitted internet destination works.
  • The routes match the operator’s intended scope.
  • You can deactivate the tunnel and explain what then uses the ordinary connection.

If it does not work

If activation succeeds but traffic fails, recheck the operator’s peer registration, endpoint reachability and allowed routes before changing settings.

Tunnel activates but nothing loads

Generate traffic to the authorized destination, then inspect the peer handshake. Confirm the endpoint, peer registration and AllowedIPs with the operator; an active switch is not a working remote connection.

Share a matching billing, evidence or setup worksheet

Only the private service works

Ask whether the profile is intentionally split routed. A private subnet in AllowedIPs does not mean all internet traffic uses the peer.

Someone needs a log or picture

Remove private keys and credentials before sharing it. Replace an exposed device key with the operator; hiding the message afterward does not revoke a key.

Stop or roll back deliberately

Choose Deactivate for this tunnel. Recheck the intended route afterward. If you enabled on-demand or automatic connection elsewhere, review that setting before assuming the tunnel will stay off.

Guide sources and image metadata · Picture credits

Privacy considerations

Peer identity and endpoint handling depend on deployment. Using WireGuard alone does not establish a commercial provider’s retention policy.

Your hosting arrangement, physical server location, account records and browser identity still matter. Plan credential management, updates, DNS, routing and connection-failure behavior before relying on a deployment.

Review the privacy checklist

Official resources

Documentation reviewed 2026-11-06. Project documentation reviewed; no independent security testing performed by StealthVPN. Use the project’s current installation and security guidance; platform support and configuration choices can change.
Official installation options (opens in a new tab)